
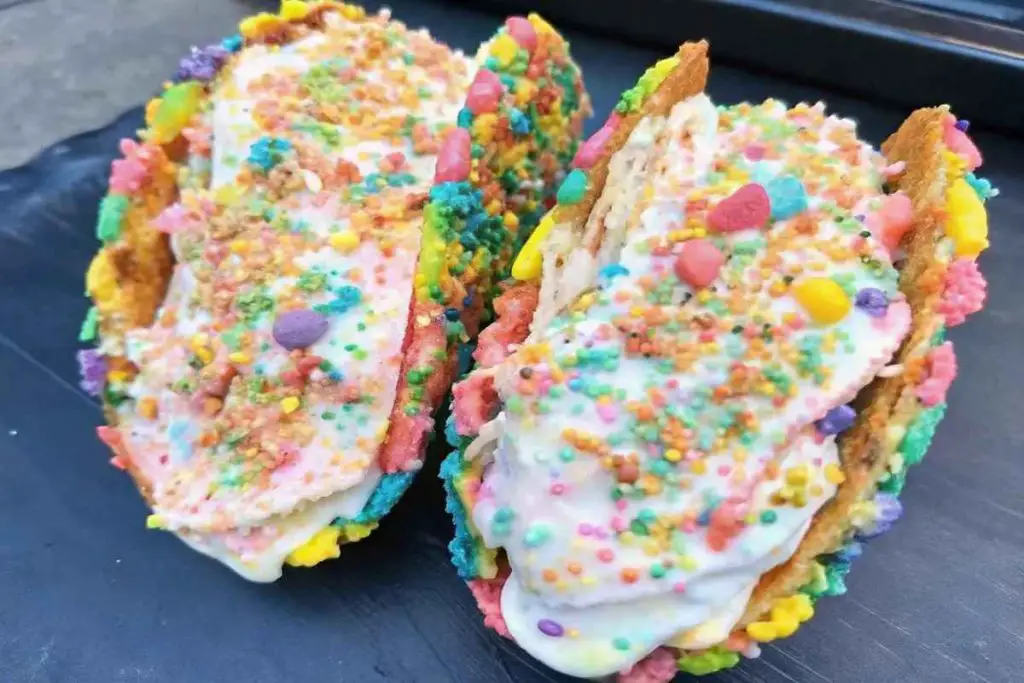
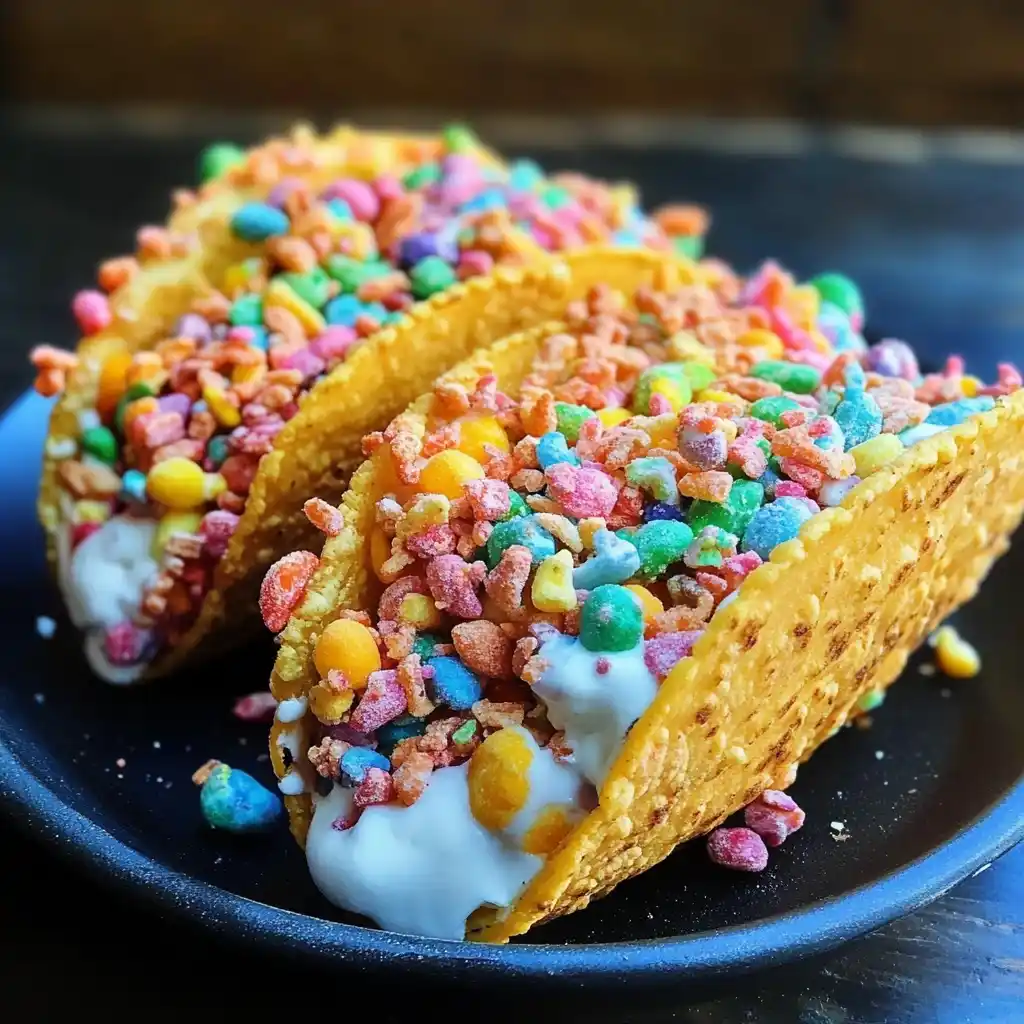
Who knew tacos could be the star of your dessert table? Enter the world of Fruity Pebbles Cheesecake Tacos, a sweet and colorful fusion that takes the classic taco and transforms it into a mouthwatering dessert. This whimsical creation is a perfect balance of crunchy, creamy, and fruity, making it a hit at parties or a fun treat for anyone with a sweet tooth. Let’s dive into what makes this dessert so special!
The Perfect Combination: Cheesecake & Fruity Pebbles
Cheesecake is already a crowd-pleaser with its rich, creamy texture. When paired with Fruity Pebbles, the result is an exciting burst of flavors and textures. The cheesecake filling is smooth and luscious, while the Fruity Pebbles add a delightful crunch and a vibrant pop of color. It’s a fun twist on traditional cheesecake, turning it into a bite-sized taco that’s as visually appealing as it is delicious.
The History of Cheesecake Tacos
The concept of dessert tacos is relatively new, combining the fun and handheld nature of a taco with the indulgence of sweet fillings. Cheesecake tacos, in particular, have gained traction as a creative way to serve cheesecake. Whether filled with fruit, chocolate, or in this case, Fruity Pebbles, these tacos provide a portable, mess-free way to enjoy your favorite dessert. The Fruity Pebbles Cheesecake Taco is just the latest iteration of this innovative dessert trend.
Essential Ingredients for Fruity Pebbles Cheesecake Tacos
To make these tasty treats, you’ll need a few key ingredients:
- Taco Shells: You can use pre-made taco shells, or if you’re feeling adventurous, you can make your own using flour tortillas that are baked or fried for that taco crunch.
- Cheesecake Filling: A classic cheesecake filling made with cream cheese, sugar, and whipped cream. You can add vanilla for extra flavor or even opt for flavored extracts like strawberry or lemon.
- Fruity Pebbles: The star of the show! These colorful cereal pieces add both texture and flavor to the tacos.
For a twist, consider using gluten-free taco shells or making a vegan cheesecake filling by substituting dairy with plant-based ingredients.
Making the Cheesecake Filling
Creating the perfect cheesecake filling is essential for these tacos. Start by beating cream cheese until smooth. Add powdered sugar, vanilla extract, and a dollop of whipped cream to achieve that creamy, fluffy texture. Make sure everything is well-combined, and chill the mixture for about 30 minutes to allow it to set properly. This ensures your filling is the right consistency—firm enough to hold in the taco shells, but soft enough to melt in your mouth.
Preparing the Taco Shells for Your Fruity Pebbles Cheesecake Tacos
You can make taco shells from scratch by lightly frying flour tortillas until they are crisp and golden. Alternatively, if you’re short on time, you can use store-bought taco shells. To add some flair, you can coat the edges of the shells in colored sugar to match the vibrant hues of the Fruity Pebbles. Just dip the shell edges in a bit of melted butter, then roll them in sugar before baking for a sweet touch.
Assembling the Fruity Pebbles Cheesecake Tacos

Now comes the fun part: assembly! Once your cheesecake filling has chilled, spoon a generous amount into each taco shell. Be careful not to overfill, as the filling should have room to spread without spilling out. Then, sprinkle a handful of Fruity Pebbles on top for that signature crunch and color. You can garnish with whipped cream or even a drizzle of chocolate or caramel for an extra indulgence.
Variations to Try: Different Flavors of Cheesecake
While the classic cheesecake filling is delicious, why not get creative? Try swapping out the vanilla for other flavors like strawberry, chocolate, or even matcha. You could also add some fruit preserves or a layer of fruit inside the shell to complement the cheesecake. The versatility of this dessert means the sky’s the limit with flavor combinations.
Vegan and Gluten-Free Options for Fruity Pebbles Cheesecake Tacos
If you’re catering to dietary restrictions, these tacos can be easily adapted. For a vegan version, use a dairy-free cream cheese alternative and coconut cream in place of whipped cream. You can also make gluten-free taco shells using corn tortillas or gluten-free flour tortillas. Just like the original, the result will be just as delicious and satisfying.
Tips for Perfecting Your Fruity Pebbles Cheesecake Tacos
Here are a few pro tips to ensure your dessert turns out perfectly:
- Don’t overfill the shells: The filling should be heaping but not spilling over. Too much filling will make it hard to eat.
- Chill the filling: It should be firm enough to hold its shape inside the taco shell.
- Use fresh Fruity Pebbles: The cereal can lose its crunch over time, so make sure it’s fresh to ensure the perfect texture.
Fun Presentation Ideas for Fruity Pebbles Cheesecake Tacos
Presentation is key when it comes to making an impact at your next gathering. Serve the tacos in a colorful basket lined with parchment paper, or arrange them on a platter with a drizzle of chocolate syrup. You can even serve them on a bed of shredded coconut for an added tropical touch. Get creative and have fun with your plating!
How to Store Leftover Fruity Pebbles Cheesecake Tacos
If you have any leftovers (which is unlikely!), store the tacos in an airtight container in the fridge. Keep the taco shells and filling separate until you’re ready to serve to prevent the shells from getting soggy. The cheesecake filling can last up to three days in the fridge, but the taco shells should be eaten within a day for the best texture.
Pairing Drinks with Fruity Pebbles Cheesecake Tacos
What better to accompany these sweet tacos than a refreshing beverage? Pair your Fruity Pebbles Cheesecake Tacos with a creamy milkshake, a cold iced coffee, or even a tangy lemon iced tea. The sweet and slightly tart drink complements the richness of the cheesecake filling beautifully.
Why Fruity Pebbles Cheesecake Tacos Make the Perfect Party Treat
Fruity Pebbles Cheesecake Tacos are not just a treat; they’re a conversation starter. Their vibrant colors and fun presentation make them the perfect dessert for birthday parties, holiday gatherings, or any event that calls for something fun and unique. Plus, they’re easy to eat with one hand, which makes them the ideal dessert for a casual gathering.
FAQs about Fruity Pebbles Cheesecake Tacos
- Can I use regular cereal instead of Fruity Pebbles?
- Absolutely! You can use other cereals like Cheerios, Cinnamon Toast Crunch, or even Rice Krispies if you prefer.
- How can I make Fruity Pebbles Cheesecake Tacos ahead of time?
- You can prepare the cheesecake filling and taco shells ahead of time. Store them separately in the fridge, and assemble just before serving.
- Can I use dairy-free ingredients for the cheesecake?
- Yes, you can! Use a plant-based cream cheese and coconut cream to make a dairy-free cheesecake filling.
- How do I make homemade taco shells for this dessert?
- To make homemade taco shells, fry flour tortillas until crispy, then bend them into a taco shape and let them cool. For added sweetness, coat them in colored sugar.
- Can I make these tacos without a cheesecake filling?
- If you prefer something lighter, you can replace the cheesecake filling with whipped cream or a mousse, creating a simpler dessert.
Conclusion
Fruity Pebbles Cheesecake Tacos are a delightful fusion of flavors and textures, making them a must-try dessert for anyone looking to get creative in the kitchen. With a rich cheesecake filling, crunchy taco shells, and the colorful twist of Fruity Pebbles, these tacos will be the highlight of your dessert table. So, what are you waiting for? Grab your ingredients and get taco-ing!
Print
Fruity Pebbles Cheesecake Tacos
- Total Time: 50 minutes
Description
Fruity Pebbles Cheesecake Tacos are a fun, vibrant dessert featuring a creamy cheesecake filling inside crunchy taco shells, topped with colorful Fruity Pebbles. These sweet treats are perfect for any occasion, offering a playful twist on traditional cheesecake.
Ingredients
- 3 cups of colorful fruity cereal (any brand will do!)
- 1/2 cup unsalted butter, melted
- 8 oz cream cheese, softened to room temperature
- 1/2 cup powdered sugar, sifted for smoothness
- 1 tsp pure vanilla extract
- 1 cup whipped cream (store-bought or homemade)
- Additional fruity cereal for garnishing
Instructions
- Prepare the Crunchy Shell:
Combine the fruity cereal and melted butter in a mixing bowl. Stir thoroughly until every piece is evenly coated with butter. This creates the base for your shells. - Shape Your Shells:
Press the buttery cereal mixture firmly into small taco-shaped molds or even muffin tins for a simpler approach. Ensure the mixture is compact to hold its shape. Chill in the refrigerator for at least 30 minutes to set. - Whisk Up the Cheesecake Filling:
In a separate bowl, beat the softened cream cheese using a hand mixer until it becomes light and fluffy. Gradually add the powdered sugar and vanilla extract, blending until smooth and creamy. - Add Airiness:
Gently fold in the whipped cream into the cream cheese mixture. Use a spatula to combine, ensuring you maintain a light and airy texture for the filling. - Assemble the Bites:
Once the cereal shells are firm, spoon the cheesecake mixture into each shell, filling them generously. - Garnish and Serve:
Sprinkle extra fruity cereal on top of each bite for added texture and visual appeal. Serve immediately or chill for a firmer texture.
Notes
- Customizable Toppings: Feel free to experiment with toppings like sprinkles, crushed cookies, or even a drizzle of melted chocolate for added flair.
- Dairy-Free Option: Substitute the cream cheese and whipped cream with plant-based alternatives to make this recipe vegan-friendly.
- Make Ahead Friendly: The cereal shells can be prepared a day in advance and stored in an airtight container to save time when assembling the bites.
- Kid-Friendly Activity: Let kids help with shaping the shells or adding toppings – it’s a fun and creative way to get them involved in the kitchen.
- Storage Tip: Store leftovers in the refrigerator for up to 3 days. Keep them in a single layer or separated by parchment paper to prevent sticking.
Keywords: Fruity Pebbles Cheesecake Tacos