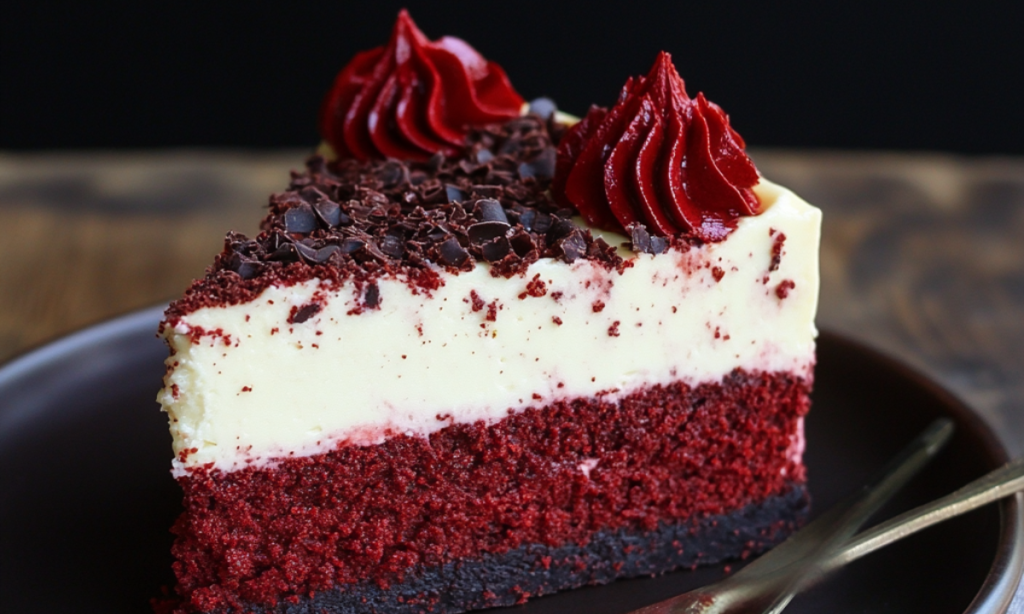
Red Velvet Cheesecake is a stunning dessert that combines the luxurious texture of cheesecake with the classic flavor of red velvet cake. This beautiful and indulgent dessert is ideal for special occasions, holidays, or whenever you want to impress your guests with something extraordinary.
What is Red Velvet Cheesecake?
Red Velvet Cheesecake is a layered dessert that typically features a red velvet cake base, topped with a rich, creamy cheesecake layer. The combination of the slight cocoa flavor in the red velvet and the tangy cream cheese creates a unique and unforgettable taste experience. Whether you’re a fan of red velvet or cheesecake, this dessert offers the best of both worlds.
Ingredients Overview
Creating the perfect Red Velvet Cheesecake starts with selecting the right ingredients:
- Cream Cheese: The star of the cheesecake layer, providing that smooth and tangy texture.
- Cocoa Powder: Adds a subtle chocolate flavor that is characteristic of red velvet cake.
- Red Food Coloring: Gives the cake its signature vibrant red color.
- Buttermilk: Helps achieve the moist and tender crumb that red velvet is known for.
For those looking to customize their cheesecake, consider adding:
- Chocolate Chips for an extra chocolatey kick.
- Cream Cheese Frosting for added richness.
- An Oreo Crust instead of the traditional cake base for a fun twist.
For a wide range of ideas on how to incorporate cream cheese into desserts, explore this collection of Cream Cheese Recipes.
Step-by-Step Recipe
Here’s how to make a Red Velvet Cheesecake that’s sure to wow:
- Preparing the Red Velvet Cake Base:
- Mix flour, sugar, cocoa powder, and baking soda in a bowl.
- In a separate bowl, combine buttermilk, eggs, vegetable oil, and red food coloring.
- Gradually add the wet ingredients to the dry ingredients, mixing until just combined.
- Pour the batter into a prepared cake pan and bake until the cake is set. Let it cool completely.
- Making the Cream Cheese Filling:
- Beat the cream cheese until smooth.
- Add sugar and mix until fully incorporated.
- Add eggs, one at a time, followed by vanilla extract.
- Combining Layers for the Perfect Cheesecake:
- Pour the cream cheese filling over the cooled red velvet cake base.
- Smooth the top with a spatula and tap the pan gently to remove any air bubbles.
- Baking Instructions for a Moist and Creamy Texture:
- Bake at 325°F (163°C) for 45-55 minutes, or until the center is slightly jiggly.
- Allow the cheesecake to cool in the oven with the door slightly open to prevent cracking.
- Cooling and Setting the Cheesecake:
- Let the cheesecake cool to room temperature before refrigerating for at least 4 hours, preferably overnight.
- Serving Suggestions and Presentation Tips:
- Serve chilled, topped with a dollop of cream cheese frosting or a drizzle of chocolate ganache.
- For a professional finish, consider decorating with edible glitter or red velvet crumbs.
For more ideas on decorating your cheesecake, you might find these Cake Decoration Tips helpful.
Tips for a Perfect Red Velvet Cheesecake
Creating the perfect Red Velvet Cheesecake requires attention to detail and a few insider tricks. Here are some tips to ensure your cheesecake turns out beautifully every time:
1. Use High-Quality Ingredients
Start with the best ingredients you can find. Use full-fat cream cheese for a rich and creamy texture, and opt for pure vanilla extract for the best flavor. Fresh buttermilk is key to achieving the tender crumb characteristic of red velvet.
2. Don’t Overmix the Batter
When mixing the cream cheese filling, be careful not to overmix. Overmixing can introduce too much air into the batter, leading to cracks during baking. Mix just until the ingredients are combined and smooth.
3. Bake at a Low Temperature
Cheesecakes are best baked at a low temperature, typically around 325°F (163°C). This allows the cheesecake to cook slowly and evenly, preventing the edges from cooking faster than the center, which can cause cracks.
4. Use a Water Bath (Bain-Marie)
Baking the cheesecake in a water bath helps to regulate the temperature and prevent cracks. To do this, wrap the outside of your springform pan with aluminum foil, then place it in a larger baking dish filled with hot water. The water should reach about halfway up the sides of the springform pan.
5. Let It Cool Gradually
Once the cheesecake is baked, turn off the oven and let it cool inside with the door slightly open. This gradual cooling helps prevent sudden temperature changes, which can cause the cheesecake to crack.
6. Refrigerate for Best Texture
After the cheesecake has cooled to room temperature, refrigerate it for at least 4 hours, preferably overnight. This chilling time allows the flavors to meld and the texture to set, resulting in a smooth, creamy cheesecake.
7. Use Natural Food Coloring
If you prefer to avoid artificial dyes, opt for natural food coloring made from beets or other vegetables. While the color might be less intense, it’s a healthier alternative that still gives your cheesecake a beautiful red hue.
8. Decorate with Precision
When it comes to decoration, less is often more. Use a piping bag to create elegant swirls of cream cheese frosting, and consider adding a sprinkle of red velvet crumbs or a dusting of cocoa powder for a professional finish.
9. Avoid Overbaking
Remember that a cheesecake is done when the center is still slightly jiggly. It will continue to set as it cools. Overbaking can cause the cheesecake to become dry and lose its creamy texture.
10. Experiment with Flavors
Don’t be afraid to add your own twist to the classic recipe. Try adding chocolate chips to the filling, using an Oreo crust instead of a traditional cake base, or adding a layer of chocolate ganache on top.
Variations
Red Velvet Cheesecake can be customized to suit different tastes and preferences:
- No-Bake Red Velvet Cheesecake: Skip the oven with a simple no-bake version that’s just as delicious and creamy.
- Vegan Red Velvet Cheesecake: Use dairy-free cream cheese and plant-based ingredients to create a vegan-friendly version.
- Red Velvet Cheesecake with Oreo Crust: Replace the traditional cake base with an Oreo crust for a delightful twist.
- Red Velvet Cheesecake Bars: Make a portable version by baking in a square pan and cutting into individual bars.
Health Considerations
While Red Velvet Cheesecake is undeniably indulgent, there are ways to make it a bit healthier:
- Nutritional Breakdown: This dessert is rich in calories and fat due to the cream cheese and sugar content.
- Calorie Content and Serving Size: A standard slice can be quite caloric, so consider serving smaller portions.
- Healthier Alternatives and Modifications:
- Use low-fat cream cheese to reduce the fat content.
- Opt for natural food coloring instead of artificial dyes.
- Consider a gluten-free crust for those with dietary restrictions.
For those interested in healthier alternatives to artificial food coloring, check out this guide on the Best Natural Food Colorings.
Pairing Suggestions
To complement the flavors of Red Velvet Cheesecake, consider these pairing options:
- Coffee Pairings: A rich espresso or a smooth latte pairs perfectly with the creamy texture of the cheesecake.
- Tea Pairings: Earl Grey or chai tea offers a delightful contrast to the sweetness of the dessert.
- Dessert Wines: A sweet port or a late harvest Riesling can enhance the flavors of the red velvet and cream cheese.
Presentation and Decoration Ideas
To make your Red Velvet Cheesecake look as good as it tastes, try these decoration ideas:
- Cream Cheese Frosting Techniques: Use a piping bag to create decorative swirls or rosettes on top.
- Adding Red Velvet Crumbs on Top: Sprinkle crumbs from the red velvet cake layer on top of the cheesecake for a textured finish.
- Using Edible Glitter for a Festive Look: Add a touch of sparkle with edible glitter, making it perfect for holidays or special occasions.
Common Mistakes to Avoid
Even with a recipe as indulgent as Red Velvet Cheesecake, mistakes can happen. Here’s how to avoid them:
- Overmixing the Batter: This can lead to a dense and heavy cheesecake. Mix just until the ingredients are combined.
- Incorrect Layering Techniques: Ensure that the red velvet base is fully cooled before adding the cream cheese layer to prevent them from mixing.
- Baking at the Wrong Temperature: Always bake at a low temperature to prevent cracking and ensure a smooth texture.
- Overbaking or Underbaking Issues: The cheesecake should be slightly jiggly in the center when done. Overbaking can cause it to dry out, while underbaking can leave it too soft.
Frequently Asked Questions
Can Red Velvet Cheesecake Be Made Ahead of Time?
Yes, Red Velvet Cheesecake can be made a day or two in advance. In fact, it often tastes better after it has had time to chill and the flavors have melded together.
How Long Does Red Velvet Cheesecake Last?
When stored properly in the refrigerator, Red Velvet Cheesecake can last up to 5 days. Be sure to cover it tightly with plastic wrap or store it in an airtight container to maintain freshness.
Can I Use Natural Food Coloring?
Yes, you can use natural food coloring to achieve the red hue in your Red Velvet Cheesecake. While the color may be slightly less vibrant, it’s a healthier alternative to artificial dyes.
Can Red Velvet Cheesecake Be Frozen?
Yes, Red Velvet Cheesecake can be frozen for up to 3 months. Wrap it tightly in plastic wrap and then in aluminum foil to prevent freezer burn. Thaw in the refrigerator overnight before serving.
What’s the Difference Between Red Velvet Cheesecake and Regular Cheesecake?
The primary difference is the red velvet cake layer that adds a slight cocoa flavor and a vibrant red color. Traditional cheesecake doesn’t include this cake layer and is typically a single, uniform texture.
Conclusion
Red Velvet Cheesecake is a stunning dessert that’s perfect for any special occasion. With its unique combination of flavors and eye-catching presentation, it’s sure to impress your guests. Whether you stick to the classic recipe or experiment with variations, this dessert is a must-try for any cheesecake lover.


