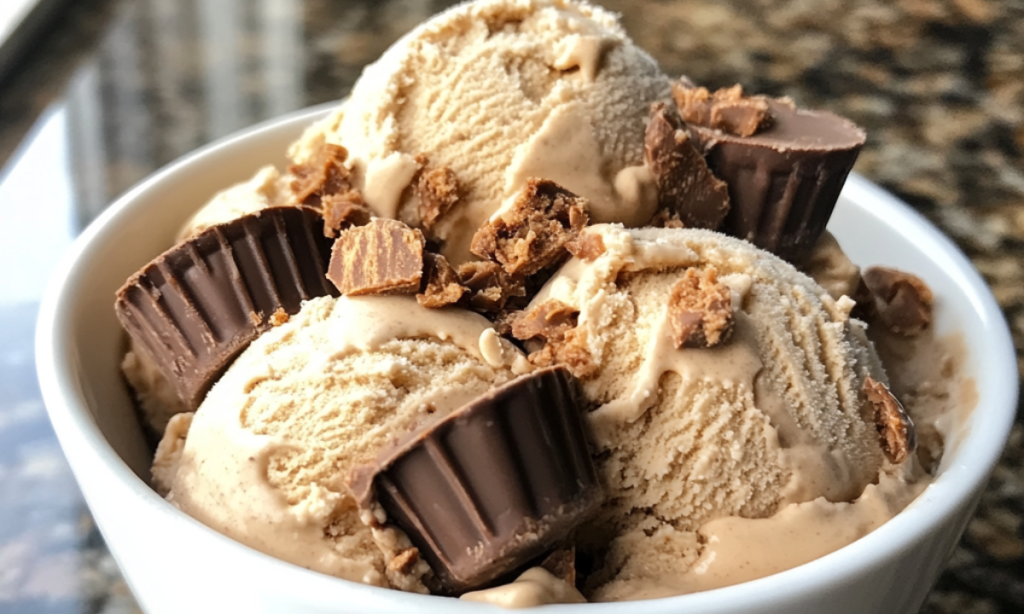
Peanut Butter Cup Ice Cream is a rich, indulgent dessert that combines the creamy, nutty flavor of peanut butter with chunks of chocolatey peanut butter cups. This flavor has become a favorite among ice cream lovers for its decadent combination of sweet and salty flavors. Whether you’re a fan of classic Reese’s or prefer homemade peanut butter cups, this ice cream recipe is sure to satisfy your cravings.
In this article, we’ll explore the history of Peanut Butter Cup Ice Cream, walk through a detailed step-by-step recipe, and offer tips on how to customize it to suit your tastes. Whether you’re making this treat for a special occasion or just to enjoy at home, you’ll find everything you need to create the perfect batch of ice cream (Serious Eats) (Allrecipes).
The History and Origins of Peanut Butter Cup Ice Cream
The delightful combination of peanut butter and chocolate has been a popular pairing in desserts for decades. The creation of Peanut Butter Cup Ice Cream likely stemmed from the success of Reese’s Peanut Butter Cups, which were first introduced in the 1920s. Over the years, the popularity of this flavor combination grew, leading to its inclusion in various desserts, including ice cream.
Peanut Butter Cup Ice Cream emerged as a fan favorite in the late 20th century, with major brands like Ben & Jerry’s and Häagen-Dazs introducing their own versions. Today, it remains one of the most sought-after flavors in grocery stores and ice cream shops (Allrecipes) (Eat This Much).
Ingredients Breakdown
Creating the perfect Peanut Butter Cup Ice Cream requires the right ingredients:
- Base Ingredients:
- Half-and-half and peanut butter are essential for creating a creamy, smooth base that holds up well when frozen.
- Sugar adds sweetness, while vanilla extract enhances the overall flavor. If you’re looking to reduce the calorie count, you can explore using sugar substitutes.
- Peanut Butter Cups:
- Commercial peanut butter cups like Reese’s are the classic choice, but homemade versions can add a personal touch. Ensure that the peanut butter cups are well-chilled before chopping to prevent them from melting into the ice cream.
- Chocolate Fudge Swirl (Optional):
- For those looking to add an extra layer of decadence, a chocolate fudge swirl made from cocoa powder, sugar, and light corn syrup can be folded into the ice cream before freezing (Serious Eats) (Allrecipes).
Step-by-Step Recipe Guide
Making the Ice Cream Base
- Blend the Ingredients: In a blender, combine half-and-half, peanut butter, sugar, and a pinch of salt. Blend until smooth.
- Chill the Mixture: Transfer the mixture to an airtight container and refrigerate for at least 3 hours, or until fully chilled.
Preparing the Peanut Butter Cups
- Freeze and Chop: Freeze your peanut butter cups for about 15 minutes to firm them up, then chop them into bite-sized pieces. Return the chopped pieces to the freezer until ready to use.
Churning the Ice Cream
- Churn the Ice Cream: Pour the chilled mixture into an ice cream maker and churn according to the manufacturer’s instructions.
- Incorporate the Peanut Butter Cups: Once the ice cream reaches a soft-serve consistency, quickly fold in the chopped peanut butter cups.
Adding the Chocolate Fudge Swirl (Optional)
- Prepare the Fudge Swirl: In a saucepan, combine cocoa powder, sugar, light corn syrup, and a bit of water. Cook over low heat until the mixture is smooth and thickened. Let it cool slightly.
- Fold in the Swirl: Using a spatula, gently fold the fudge swirl into the churned ice cream, creating a marbled effect.
Final Assembly
- Freeze the Ice Cream: Transfer the mixture to an airtight container and freeze for at least 4 hours, or until firm.
- Serve and Enjoy: Scoop the ice cream into bowls or cones and enjoy your homemade Peanut Butter Cup Ice Cream (Serious Eats) (Eat This Much).
Nutritional Information and Health Considerations
Peanut Butter Cup Ice Cream is undeniably rich, with a high content of fats and sugars. A typical serving contains around 370 calories, with significant amounts of saturated fat and sugar. If you’re watching your calorie intake, consider these alternatives:
- Low-Fat Dairy: Substitute half-and-half with a lower-fat milk or a dairy-free alternative like almond milk.
- Sugar Substitutes: To cut down on sugar, use sweeteners like erythritol or stevia (Eat This Much) (Eat This Much).
Variations of Peanut Butter Cup Ice Cream
This ice cream can be customized in numerous ways to suit different dietary needs and preferences:
- Vegan/Dairy-Free Option: Use coconut milk or almond milk as a base, and select dairy-free peanut butter cups.
- Low-Sugar or Keto-Friendly Version: Explore sugar substitutes and low-carb chocolate options to make this dessert keto-friendly.
- Gluten-Free Option: Ensure that all ingredients, including peanut butter cups, are certified gluten-free to cater to dietary restrictions.
- Creative Twists: Add ingredients like caramel swirls, pretzel pieces, or banana slices to create your own unique version of this classic ice cream (Serious Eats) (Allrecipes).
Serving Suggestions
Peanut Butter Cup Ice Cream is versatile and can be served in many ways:
- Pair it with Brownies: The rich chocolate flavor of brownies complements the creaminess of the ice cream perfectly.
- Top with Extra Peanut Butter Cups: Add a handful of chopped peanut butter cups on top for extra crunch and flavor.
- Presentation Tips: Serve in waffle cones or bowls with a drizzle of chocolate sauce for a visually appealing dessert (Eat This Much).
Common Mistakes and How to Avoid Them
Making homemade ice cream can sometimes lead to common issues, but these tips will help you avoid them:
- Over-churning the Ice Cream: This can lead to a dense, icy texture. Stop churning once the mixture reaches a soft-serve consistency.
- Uneven Distribution of Peanut Butter Cups: To ensure even distribution, fold in the peanut butter cups gently at the end of the churning process.
- Ice Crystals: To avoid ice crystals forming, make sure the mixture is fully chilled before churning and use airtight containers for storage (Serious Eats) (Eat This Much).
FAQ Section
Can I Make Peanut Butter Cup Ice Cream Without an Ice Cream Maker?
Yes, you can! Simply whip the cream until it forms stiff peaks, then fold in the sweetened condensed milk, peanut butter, and chopped peanut butter cups. Freeze the mixture until firm.
What’s the Best Type of Peanut Butter to Use?
A smooth, no-stir peanut butter works best for creating a creamy texture. However, if you prefer a bit of crunch, you can use chunky peanut butter.
How Long Can Homemade Peanut Butter Cup Ice Cream Be Stored?
Homemade ice cream can be stored in the freezer for up to two weeks. Be sure to keep it in an airtight container to prevent ice crystals from forming.
Can I Use Dark Chocolate Instead of Milk Chocolate for the Cups?
Absolutely! Dark chocolate peanut butter cups can add a deeper, richer flavor to the ice cream.
Is It Possible to Make This Recipe Without Dairy?
Yes, simply substitute the dairy ingredients with coconut milk, almond milk, or another plant-based alternative.
How Can I Add Extra Mix-Ins Without Affecting the Texture?
Mix-ins like caramel or pretzels should be added just before the ice cream is fully frozen to ensure they don’t alter the texture (Serious Eats) (Allrecipes).
Conclusion and Final Thoughts
Peanut Butter Cup Ice Cream is a delicious and indulgent treat that’s surprisingly easy to make at home. Whether you stick to the classic recipe or experiment with different variations, this ice cream is sure to satisfy any sweet tooth. So, why not give it a try? With just a few ingredients and some simple steps, you can create a dessert that’s not only delicious but also customizable to your tastes. Enjoy every creamy, peanut buttery bite!


